
Vue2(上)
""
ES5和ES6
` ## const所定义的对象,不可以被重新定义,但是可以改变对象中的属性
ES6对象字面量增强写法
ES5:
const name='eric';
const age=18;
const height=1.8

const user = {
	name:name,
    age:age,
    height:height
}


ES6:
const name='eric';
const age=18;
const height=1.8

const user = {
	name,
    age,
    height
}
` ES6会将变量名定义为key,变量的值定义为对象的key的值
ES5中的函数:
const user={
	run:function(){

	},
    eat:function(){

    }
}


ES6:
const user={
    run(){

    },
    eat(){

    }
}
Vue
Vuejs安装
` vue开发版本安装:https://cn.vuejs.org/v2/guide/installation.html
初识Vue
定义vue时用new定义,将new的对象赋值给一个变量时,可以用var、let、const` var为局部定义,不建议使用。let定义变量,之后可以改变值。const定义常量不可以改变值
Vue模板
html代码中使用vue直接写出vue基础模板

`<body>`
`<div id="app">`
  {{message}}
`</div>`

`<script src="../js/vue.js">``</script>`
`<script>`
  const app = new Vue({
    el:'#app',
    data:{
      message:'nihao'
    }
  });
`</script>`
`</body>`
Vue生命周期

Mustache
插值操作,Mustache的就是指的大括号
一、基本语法
`<body>`
`<div id="app">`
  {{message}}
`</div>`


`<script src="../js/vue.js">``</script>`
`<script>`
  const app = new Vue({
    el:'#app',
    data:{
      message:'HelloWorld'
    }
  });
`</script>`
`</body>`
二、基本表达式
`<div id="app">`
  {{message + message2}}
  `<h2>` {{message}} {{message2}} `</h2>`
`</div>`


`<script src="../js/vue.js">``</script>`
`<script>`
  const app = new Vue({
    el:'#app',
    data:{
      message:'HelloWorld',
      message2:',i am eric'

    }
  });
`</script>`
基本语法
v-once
某些情况下,不希望界面随意的跟随改变
该指令后不要跟任何表达式
该指令表示元素和组件只渲染一次,不会随着数据的改变而改变
`<div id="app">`
  `<h1 v-once>`{{message}}`</h1>`
`</div>`

`<script src="../js/vue.js">``</script>`
`<script>`
  const app = new Vue({
    el:'#app',
    data:{
      message:'我是第一次的数据'
    }
  });
`</script>`
v-html
从服务器请求到的是一个html代码是需要用到v-html
使用v-html将把html代码样式的字符被vue解析
`<div id="app">`
  `<h2 v-html="url">``</h2>`
`</div>`

`<script src="../js/vue.js">``</script>`
`<script>`
  const app = new Vue({
    el:'#app',
    data:{
      message:'',
      url:'`<a href="http://www.baidu.com">`百度一下`</a>`'
    }
  });
`</script>`
v-text
和Mustache比较相似,都是用于将数据显示在界面中
会把之前标签里的内容覆盖掉
`<div id="app">`
  `<h2 v-text="message">`我是之前的数据`</h2>`
`</div>`

`<script src="../js/vue.js">``</script>`
`<script>`
  const app = new Vue({
    el:'#app',
    data:{
      message:'hello'
    }
  });
`</script>`
v-pre
将标签中的内容原封不动的输出在页面上
`<div id="app">`
  `<h2 v-pre>`{{message}}`</h2>`
`</div>`


`<script src="../js/vue.js">``</script>`
`<script>`
  const app = new Vue({
    el:'#app',
    data:{
      message:'hello'
    }
  });
`</script>`
` 输出结果是
v-cloak
在某些情况下,浏览器可能会直接显示未被vue解析的代码
cloak:斗篷
`<style>`
    [v-cloak]{
      display: none;
    }
`</style>`
.
.
.
`<div id="app" v-cloak>`
  {{message}}
`</div>`


`<script src="../js/vue.js">``</script>`
`<script>`
  const app = new Vue({
    el:'#app',
    data:{
      message:'hello'
    }
  });
`</script>`
在vue解析之前,div中有属性v-cloak在vue解析之后,div中就没有了属性v-cloak,` 用css控制div的display属性,在此div没有被vue渲染时不会被显示而不是显示
v-bind
用于绑定一个或多个属性值
如图片的链接,网站a标签的链接。通过vue绑定src或href
`<div id="app">`
  `<img v-bind:src="imgURL"/>`
  `<a v-bind:href="aHref">`百度一下`</a>`

    `<!-- 语法糖写法 -->`
  `<img :src="imgURL"/>`
  `<a :href="aHref">`百度一下`</a>`
`</div>`


`<script src="../js/vue.js">``</script>`
`<script>`
  const app = new Vue({
    el:'#app',
    data:{
      message:'',
      imgURL:'https://s.cn.bing.net/th?id=OHR.Mitsumata_ZH-CN9794271032_1920x1080.jpg&rf=LaDigue_1920x1080.jpg',
      aHref:'http://www.baidu.com'
    }
  });
`</script>`
v-bind语法糖: v-bind的简写方式,如 v-bind:src="" 简写为 :src=""` v-bind:href="" 简写为 :href=""
v-bing动态绑定class属性
动态的启动class, :class="{active:isActive,line:isLine}"
active的css样式在isActive为true时才会显示,也可以在v-bind之外再写一个class来固定一个样式
最终解析代码时,哪个css类的值是true,哪个就被拼接在一起解析
`<div id="app">`
  `<h1 class="title" v-bind:class="{active:isActive,line:isLine}">`{{message}}`</h1>`
  `<button @click="change()">`按钮`</button>`
`</div>`

`<script src="../js/vue.js">``</script>`
`<script>`
  const app = new Vue({
    el:'#app',
    data:{
      message:'测试一',
      isActive:true
    },
    methods:{
      change:function (){
        this.isActive=!this.isActive
      }
    }
  });
`</script>`
` 如果过于复杂,可以放在一个methods或者computed中
methods中写css类对象方法,返回对象
将class后的对象放在methods中的return方法中,可以调用方法来获取对象
`<div id="app">`
  `<h1 v-bind:class="{active:isActive}">`{{message}}`</h1>`
  `<h1 v-bind:class="getClasss()">`{{message}}`</h1>`
  `<button @click="change()">`按钮`</button>`
`</div>`

`<script src="../js/vue.js">``</script>`
`<script>`
  const app = new Vue({
    el:'#app',
    data:{
      message:'测试一',
      isActive:true
    },
    methods:{
      change:function (){
        this.isActive=!this.isActive
      },
      getClasss:function (){
        return {active:this.isActive}
      }
    }
  });
`</script>`
动态绑定class,用数组方式
数组中被引号引起来的不会被vue所解析,就是div受到aaaa和line的css类效果
`<div id="app">`
  `<h1 v-bind:class="[active,'line']">`{{message}}`</h1>`
  `<button @click="change()">`按钮`</button>`
`</div>`

`<script src="../js/vue.js">``</script>`
`<script>`
  const app = new Vue({
    el:'#app',
    data:{
      message:'测试一',
      active:'aaaaa'
    }
  });
`</script>`
案例:点击列表某一项变色
`<style>`
    .active{
      color: red;
    }
  `</style>`

`<div id="app">`
  `<ul>`
    `<li v-for="(item,index) in movies"
        :class="{active:currentIndex === index}"
        @click="liClick(index)">`
      {{index}}-{{item}}
    `</li>`
  `</ul>`
`</div>`


`<script src="../js/vue.js">``</script>`
`<script>`
  const app = new Vue({
    el:'#app',
    data:{
      movies:['海王','海贼王','火影忍者','妖精的尾巴'],
      currentIndex:0
    },
    methods:{
      liClick(index){
        this.currentIndex = index
      }
    }
  });
`</script>`
v-bind动态绑定style属性
无
计算属性
methods和computed的区别
- 计算属性会进行缓存,如果多次使用,计算属性只会调用一次
1.基本使用
computed:{
}
计算属性中的方法是一个属性,调用时不需要加括号
`<div id="app">`
  `<h2>`{{firstName}}  {{lastName}}`</h2>`
  `<h2>`{{getFullName()}}`</h2>`
  `<h2>`{{fullName}}`</h2>`
`</div>`


`<script src="../js/vue.js">``</script>`
`<script>`
  const app = new Vue({
    el:'#app',
    data:{
      firstName:'eric',
      lastName:'kiku'
    },
    //计算属性
    computed:{
      fullName:function(){
        return this.firstName+this.lastName
      }
    },
    methods:{
      getFullName:function (){
        return this.firstName+' '+this.lastName
      }
    }
  });
`</script>`
` 使用直接加和methods方法和computed方法
2.复杂使用
`<div id="app">`
  {{total}}
`</div>`


`<script src="../js/vue.js">``</script>`
`<script>`
  const app = new Vue({
    el:'#app',
    data:{
      books:[
        {id:110,name:'one',price:10},
        {id:111,name:'two',price:10},
      ]
    },
    computed:{
      total:function (){
        let sum=0;
        for(let i=0;i`<this.books.length;i++){
          sum+=this.books[i].price
        }
        return sum
      }

    }
  });
`</script>`
3.计算属性的settre和getter
其实计算属性的格式本应该是这样
由于不可以随意修改计算属性的值,所以默认省略set方法,只留下get方法
就变为了上述的样式
计算属性之所以在调用时没有括号,就是因为 属性变量调用get方法时不需要括号
如: User user = new User();` user.getNmae();
`<div id="app">`
  `<h2>`{{fullName}}`</h2>`
`</div>`


`<script src="../js/vue.js">``</script>`
`<script>`
  const app = new Vue({
    el:'#app',
    data: {
      message: 'hello',
      firstName: "eric",
      lastName: 'kiku'
    },
    computed:{
      fullName:{
        set:function (){

        },
        get:function (){
          return  this.firstName+' ' + this.lastName
        }
      }
    }

  });
`</script>`
事件监听
v-on
在定义方法时,如果调用的地方没有传入参数而方法却有形参,将会把 鼠标操作的Event 传入形参。
如果想传入参数和Event对象,可以使用 $Event 传输
` 语法糖:@click
`<div id="app">`
  `<button @click="btn1()">`按钮`</button>`
  `<button @click="btn1('abc',$event)">`按钮`</button>`
`</div>`


`<script src="../js/vue.js">``</script>`
`<script>`
  const app = new Vue({
    el:'#app',
    data:{
      message:''
    },
    methods:{
      btn1(abc,event){
        console.log(abc,event);
      }
    }
  });
`</script>`
v-on的修饰符
`<!--  停止冒泡  -->`
  `<button @click.stop="doThis">``</button>`
`<!--  阻止默认行为  -->`
  `<button @click.prevent="doThis">``</button>`
`<!--  阻止默认行为,没有表达式  -->`
  `<button @click.prevent>``</button>`
`<!--  串联修饰符  -->`
  `<button @click.stop.prevent="doThis">``</button>`
`<!--  键修饰符,键别名  -->`
  `<button @keyup.enter="doThis">``</button>`
`<!--  键修饰符,键代码  -->`
  `<button @keyup.13="doThis">``</button>`
`<!--  点击回调只会触发一次  -->`
  `<button @click.once="doThis">``</button>`
如果元素的父级元素也有点击方法,那么会发生事件冒泡
按钮的点击事件触发时,div的点击事件也会触发。称为事件冒泡
`<div id="app">`
  `<div @click="div">`
    aaaa
    `<button @click="btn">` 按钮`</button>`
  `</div>`
`</div>`

`<script src="../js/vue.js">``</script>`
`<script>`
  const app = new Vue({
    el:'#app',
    data:{
      message:''
    },
    methods:{
      btn(){
        console.log('btnClick');
      },
      div(){
        console.log('divClick');
      }
    }
  });
`</script>`
解决方法一:` 在点击事件处添加修饰符 : @click.stop 可以阻止冒泡
阻止表单提交按钮的默认事件
条件判断
v-if、v-else-if、v-else
- Vue的条件指令可以根据表达式的值在DOM中渲染或销毁元素或组件
原理:v-if后面的条件是false时,对应的元素不会被渲染,也就是根本不会有对应的标签出现在DOM中
`<div id="app">`
  `<h2 v-if=isShow>`isShow是true我出来`</h2>`
  `<h2 v-else>`isShow是false我出来`</h2>`
  `<button @click="isShowBtn">`按钮`</button>`
`</div>`


`<script src="../js/vue.js">``</script>`
`<script>`
  const app = new Vue({
    el:'#app',
    data:{
      message:'',
      isShow:true
    },
    methods:{
      isShowBtn(){
        this.isShow=!this.isShow
      }
    }
  });
`</script>`
`<div id="app">`
  `<h2 v-if="score>`=90">`优秀`</h2>`
  `<h2 v-else-if="score>`=80">`良好`</h2>`
  `<h2 v-else-if="score>`=60">`及格`</h2>`
  `<h2 v-else>`不及格`</h2>`

`</div>`
使用计算属性:
`<div id="app">`
  `<h2>`{{result}}`</h2>`

`</div>`


`<script src="../js/vue.js">``</script>`
`<script>`
  const app = new Vue({
    el:'#app',
    data:{
      score:91
    },
    computed:{
      result(){
        let leve = '';
        if(this.score>`=90){
          leve='优秀';
        }else if(this.score>`=60){
          leve='及格';
        }else{
          leve='不及格';
        }
        return leve;
      }
    }
  });
`</script>`
v-show
- v-show和v-if都可以决定一个元素是否渲染,
当v-if条件为false时,此元素根本不会在DOM中
当v-show条件为false时,此元素仅仅是display属性设置为none而已
当需要在显示与隐藏之间频繁切换时,用v-show` 当只切换一次时,用v-if
循环遍历
v-for循环遍历对象
此遍历会将对象中的每一个key的value值遍历一遍
`<div id="app">`
  `<ul>`
    `<li v-for="item in info">`{{item}}`</li>`
  `</ul>`
`</div>`


`<script src="../js/vue.js">``</script>`
`<script>`
  const app = new Vue({
    el:'#app',
    data:{
      message:'',
      info:{
        name:'why',
        age:18,
        height:1.88
      }
    }
  });
`</script>`
- why- 18 ` - 1.88
如果想要输出键和值,就要用格式==(value,key)==
`<ul>`
    `<li v-for="(value,key) in info">`
        {{value}}-{{key}}
    `</li>`
`</ul>`
- why-name- 18-age ` - 1.88-height
如果想要输出value值和key值,和index值
格式:(value,key,index)
`<ul>`
    `<li v-for="(value,key,index) in info">`
        {{value}}-{{key}}-{{index}}
    `</li>`
`</ul>`
组件的key属性
在使用v-for时,在对应的元素上添加一个 :key 属性,来指定一一对应的key和遍历的值。
一句话,key的作用主要是为了高效的更新虚拟DOM
`<div id="app">`
  `<ul>`
    `<li v-for="item in letters" :key="item">`{{item}}`</li>`
  `</ul>`
`</div>`


`<script src="../js/vue.js">``</script>`
`<script>`
  const app = new Vue({
    el:'#app',
    data:{
      letters:['a','b','c']
    }
  });
`</script>`
` 绑定的key尽量是唯一的,如果不唯一,效果基本等于没有
哪些数组的方法是响应式的
- pust方法 添加方法,可以一次添加多个
this.options.push('a','b ')
- pop方法 删除方法,删除最后一个元素
this.options.pop()
- shift方法 删除方法,删除第一个元素
this.options.shift()
- unshift方法 在数组最前面添加元素,可以一次添加多个
this.options.unshift('aaa')
- splice
- sort
- reverse
` 上三个没有听,等想听了再去听一下吧
JavaScript高阶函数的使用(未听)
v-model的用法
v-model:radio
通过v-model绑定一个属性来控制radio单选框的选择
在有v-model的时候,可以不用写name也可以让这两个单选框互斥
对v-model所绑定的sex属性,sex的默认值决定radio单选的默认值
`<div id="app">`
  `<label for="male">`
    `<!--没有name属性,v-model绑定的值是一样的时候,也可以互斥-->`
    `<input id="male" type="radio" name="sex" value="男" v-model="sex">`男
  `</label>`
  `<label for="female">`
    `<input id="female" type="radio" name="sex" value="女" v-model="sex">`女
  `</label>`
  `<p>`你他蜡笔点的是:{{sex}}`</p>`
`</div>`


`<script src="../js/vue.js">``</script>`
`<script>`
  const app = new Vue({
    el:'#app',
    data:{
      message:'',
      sex:'女'
    }
  });
`</script>`
v-model: checkbox
单个复选框
绑定boolean属性,选中是true,没有选中是false。
按钮的disabled属性是参数为false时不可以点击
`<div id="app">`
 `<label for="agree">`
    `<input id="agree" type="checkbox" v-model="agree">`同意协议
  `</label>`
  `<button :disabled="!agree">`下一步`</button>``<br>`

`</div>`


`<script src="../js/vue.js">``</script>`
`<script>`
  const app = new Vue({
    el:'#app',
    data:{
      message:''
      agree:false
    }
  });
`</script>`
多个复选框
绑定数组属性,
被选中时就会添加在数组中,不被选中时从数组中移除
`<div id="app">`
  `<input type="checkbox" value="篮球" v-model="hobbies">`篮球
  `<input type="checkbox" value="足球" v-model="hobbies">`足球
  `<input type="checkbox" value="羽毛球" v-model="hobbies">`羽毛球
  `<input type="checkbox" value="乒乓球" v-model="hobbies">`乒乓球
  `<h2>`你选择的是:{{hobbies}}`</h2>`
`</div>`


`<script src="../js/vue.js">``</script>`
`<script>`
  const app = new Vue({
    el:'#app',
    data:{
      message:'',
      hobbies:[]
    }
  });
`</script>`

v-model结合select
将绑定的属性放在select里面
用来监听选择了 那个选项
在select中写入 multiple 可以多选,将选择的选项都添加到数组中
`<div id="app">`
  `<!--1.选择一个-->`
  `<select name="a" v-model="fruit">`
    `<option value="苹果">`苹果`</option>`
    `<option value="香蕉">`香蕉`</option>`
    `<option value="猕猴桃">`猕猴桃`</option>`
    `<option value="榴莲">`榴莲`</option>`
  `</select>`
  `<!--1.选择多个-->`
  `<select name="a" v-model="fruits" multiple>`
    `<option value="苹果">`苹果`</option>`
    `<option value="香蕉">`香蕉`</option>`
    `<option value="猕猴桃">`猕猴桃`</option>`
    `<option value="榴莲">`榴莲`</option>`
  `</select>`
  `<p>`{{fruits}}`</p>`
`</div>`


`<script src="../js/vue.js">``</script>`
`<script>`
  const app = new Vue({
    el:'#app',
    data:{
      message:'',
      fruit:'香蕉',
      fruits:[]
    }
  });
`</script>`
v-model的修饰符
.lazy
懒加载,不会实时更新数据,在输入完之后回车才会双向绑定数据
`<div id="app">`
  `<!--1.修饰符:lazy-->`
  `<input type="text" v-model.lazy="message">`
  `<h2>`{{message}}`</h2>`

`</div>`

`<script src="../js/vue.js">``</script>`
`<script>`
  const app = new Vue({
    el:'#app',
    data:{
      message:'hello'
    }
  });
`</script>`
.number
由于input所接受的数据,默认会转成string类型,如果想要获取number类型的数据,就必须需要.number修饰符
`<div id="app">`

  `<!--2.修饰符:number    -->`
  `<input type="number" v-model.number="age">`
  `<h2>`{{typeof age}}`</h2>`
`</div>`

`<script src="../js/vue.js">``</script>`
`<script>`
  const app = new Vue({
    el:'#app',
    data:{
      age: 0
    }
  });
`</script>`
.trim
去除数据左右两边的空格
`<div id="app">`
  `<!--3.修饰符:trim    -->`
  `<input type="number" v-model.trim="name">`
`</div>`


`<script src="../js/vue.js">``</script>`
`<script>`
  const app = new Vue({
    el:'#app',
    data:{
      name:''
    }
  });
`</script>`
组件化编程
注册组件的基本步骤
创建组件构造器 调用Vue.extend()方法
注册组件 调用Vue.component()方法
使用组件 在Vue实例范围内使用组件
` 注册组件的Vue.component有两个参数,一个是标签名,一个是组件内容
`<div id="app">`
  `<eric>``</eric>`
`</div>`

`<script src="../js/vue.js">``</script>`
`<script>`

  //1.创建组件构造器对象
  const cpnC = Vue.extend({
    template:`
      `<div>`
        `<h2>`我是标题`</h2>`
        `<h2>`哈哈哈哈哈`</h2>`
        `<h2>`嘿嘿嘿嘿嘿`</h2>`
      `</div>`
    `
  })

  //2.注册组件
  Vue.component('eric',cpnC)
  const app = new Vue({
    el:'#app',
    data:{
      message:''
    }
  });
`</script>`
## 我是标题## 哈哈哈哈哈` ## 嘿嘿嘿嘿嘿
全局组件和局部组件
创建玩组件构造器后,在实例外注册的是全局组件。在实例内部注册的是局部组件
`<div id="app">`
  `<eric>``</eric>`
`</div>`

`<script src="../js/vue.js">``</script>`
`<script>`

  //1.创建组件构造器对象
  const cpnC = Vue.extend({
    template:`
      `<div>`
        `<h2>`我是标题`</h2>`
        `<h2>`哈哈哈哈哈`</h2>`
        `<h2>`嘿嘿嘿嘿嘿`</h2>`
      `</div>`
    `
  })

  //2.注册组件
  // Vue.component('eric',cpnC)
  const app = new Vue({
    el:'#app',
    data:{
      message:''
    },
    components:{
      //eric使用组件时的标签名
      eric:cpnC
    }
  });
`</script>`
` 新的属性:components. 为组件标签赋值, eric是想用什么样的标签,eric后的值是创建的组件构造器模板
在创建组件对象时,可以注册另一个组件,从而将这个组件变为自己的子组件,子组件无法被外部使用
`<div id="app">`
  `<cpn2>``</cpn2>`
`</div>`


`<script src="../js/vue.js">``</script>`
`<script>`
	//组件1
  const cpnC1 = Vue.extend({
    template:`
      `<div>`
        `<h2>`我是标题1`</h2>`
        `<h2>`我是内容,哈哈哈`</h2>`
      `</div>`
    `
  })
	//组件2
  const cpnC2 = Vue.extend({
    template:`
      `<div>`
        `<h2>`我是标题2`</h2>`
        `<h2>`我是内容,嘿嘿嘿嘿`</h2>`
      `<cpn1>``</cpn1>`
      `</div>`
    `,
    components:{
      cpn1:cpnC1
    }
  })

  const app = new Vue({
    el:'#app',
    data:{
      message:''
    },
    components:{
      cpn2:cpnC2
    }
  });
`</script>`
组件的语法糖格式
将创建对象的这一步放在注册里面
`<div id="app">`
  `<eric>``</eric>`
  `<eric2>``</eric2>`
`</div>`


`<script src="../js/vue.js">``</script>`
`<script>`
  //1.全局组件注册的语法糖
  Vue.component('eric',{
    template:`
      `<div>`
        `<h2>`我是标题1`</h2>`
        `<h2>`我是内容,哈哈哈`</h2>`
      `</div>`
    `
  })
  const app = new Vue({
    el:'#app',
    data:{
      message:''
    },
    components:{ //局部注册的语法糖
      'eric2':{
        template: `
          `<div>`
            `<h2>`我是标题2`</h2>`
            `<h2>`我是内容2,哈哈哈`</h2>`
          `</div>`
        `
      }
    }
  });
`</script>`
组件和模板分离
在html处写模板,注册是使用#id 引入
`<div id="app">`
  `<eric>``</eric>`
`</div>`

`<template  id="eric">`
  `<div>`
    `<h2>`我是标题`</h2>`
    `<p>`我是内容.....`</p>`
  `</div>`
`</template>`

`<script src="../js/vue.js">``</script>`
`<script>`

  Vue.component('eric',{
    template: '#eric'
  })

  const app = new Vue({
    el:'#app',
    data:{
      message:''
    }
  });
`</script>`
组件中数据存放问题
组件注册时,除了template以外,还可以写data和methods
但是data必须是一个函数data(){} 。这是因为,函数拥有自己的作用域,在页面复用多个组件时,每一个组件中的数据都不相互影响
`<div id="app">`
  {{message}}
  `<eric>``</eric>`
  `<eric>``</eric>`
  `<eric>``</eric>`
`</div>`

`<template  id="eric">`
  `<div>`
    `<h2>`{{title}}`</h2>`
    `<p>`{{count}}`</p>`
    `<button @click="add()">`+`</button>`
  `</div>`
`</template>`

`<script src="../js/vue.js">``</script>`
`<script>`

  Vue.component('eric',{
    template: '#eric',
    data(){
      return {
        title:'i am title',
        count:0
      }
    },
    methods:{
      add(){
        this.count+=1
      }
    }
  })

  const app = new Vue({
    el:'#app',
    data:{
      message:'wwwww',
      title1:'i am vue.title'
    }
  });
`</script>`
父子组件的通信
- 通过props向子组件传递数据
- 通过事件向父组件发送消息
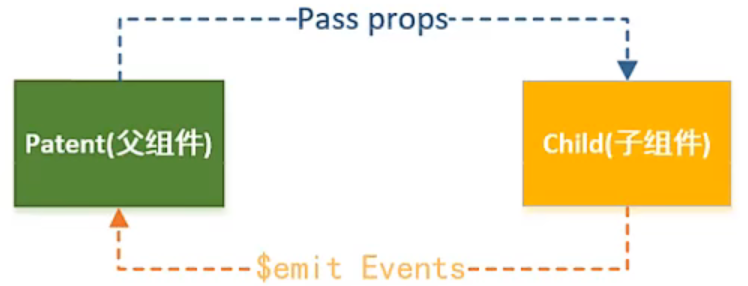
父组件向子组件传输数据
1.创建模板,在模板中使用插值====语法来获取对象中的数据
2.创建对象,来存放模板和模板需要的数据
3.在vue实例中注册模板
`<div id="app">`
  `<eric v-bind:cname="name">``</eric>`
`</div>`
`<!-- 创建模板 -->`
`<template id="cpn">`
  `<div>`
    {{title}}
    {{cname}}
  `</div>`
`</template>`


`<script src="../js/vue.js">``</script>`
`<script>`
//创建对象
  const cpn = {
    template:`#cpn`,
    props:['cname'],
    data(){
      return {
        title:'我是被父组件传过来的数据'
      }
    }
  }

//vue实例注册模板对象
  const app = new Vue({
    el:'#app',
    data:{
      message:'',
      name:'xiaoli'
    },
    components:{
      eric:cpn
    }
  });
`</script>`
子组件向父组件传输数据
重点的代码行用星号标出
1.创建模板
2.创建对象,来存放模板和模板需要的数据,并且添加一个methods属性来监听子组件的事件
3.在vue实例中注册模板
4.在子组件模板中设置监听事件,触发时,在子组件对象的methods中监听到并且创建自定义事件,来将监听到的数据传输到父组件
5.父组件在使用子组件标签的地方使用v-on 语法糖就是==@== 来监听这个自定义事件,并且将监听到的事件响应到父组件实例中的methods属性的方法中,来完成子向父的传递
` 在使用v-on来监听子组件并响应父组件的时候,只有一个参数时,可以不用写,如click的默认参数是传递一个even,子组件监听的自定义事件会默认传递自定义事件后的参数
`<!--父组件模板-->`
`<div id="app">`
  `<eric @item-click="cpnClick">``</eric>`//****
`</div>`
`<!--模板-->`
`<template id="cpn">`
  `<div>`
    {{title}}
    `<button v-for="item in select" @click="btnClick(item)">`{{item.name}}`</button>`
  `</div>`
`</template>`
`<script src="../js/vue.js">``</script>`
`<script>`
  `<!--子组件对象-->`
  const cpn = {
    template:`#cpn`,
    data(){
      return {
        select:[
          {id:'a',name:'热门推荐'},
          {id:'a',name:'手机数码'},
          {id:'a',name:'电脑家电'}
        ]
      }
    },
    methods:{
      btnClick(item){
        this.$emit('item-click',item)//****
      }
    }
  }
  //父组件实例
  const app = new Vue({
    el:'#app',
    data:{
      message:''
    },
    components:{
      eric:cpn
    },
    methods:{
      cpnClick(item){//****
        console.log(item);
      }
    }
  });
`</script>`
父组件直接访问子组件中的属性或者方法-$refs
使用 $refs 来实现父组件访问子组件
1.创建子组件模板并在父组件中注册,
2.子组件有data属性和methods属性,父组件也有
3.子组件复用多次,并在父组件模板中创建一个按钮,点击按钮获取子组件中的一些数据
4.$children 也可以实现,只不过,此方法无法指定子组件对象,在之后插入其他的子组件后会错乱,而refs可以指定ref 属性来指定访问哪个对象
`<div id="app">`
  `<cpn ref="one">``</cpn>`
  `<cpn ref="two">``</cpn>`
  `<button @click="btnClick">`按钮`</button>`
`</div>`


`<template id="cpn">`
  `<div>`我是子组件`</div>`
`</template>`

`<script src="../js/vue.js">``</script>`
`<script>`
  const app = new Vue({
    el:'#app',
    data:{
      message:''
    },
    methods:{		//父组件中的方法属性
      btnClick(){
        console.log(this.$refs.one.name);
        this.$refs.one.showMessage();
      }
    },
    components:{
      cpn:{
        template:`#cpn`,
        data(){
          return{
            name:'我是子组件'
          }
        },
        methods:{		//子组件中的方法属性
          showMessage(){
            console.log('showMessage');
          }
        }
      }
    }
  });
`</script>`
子访问父(未学,可不学)
插槽slot
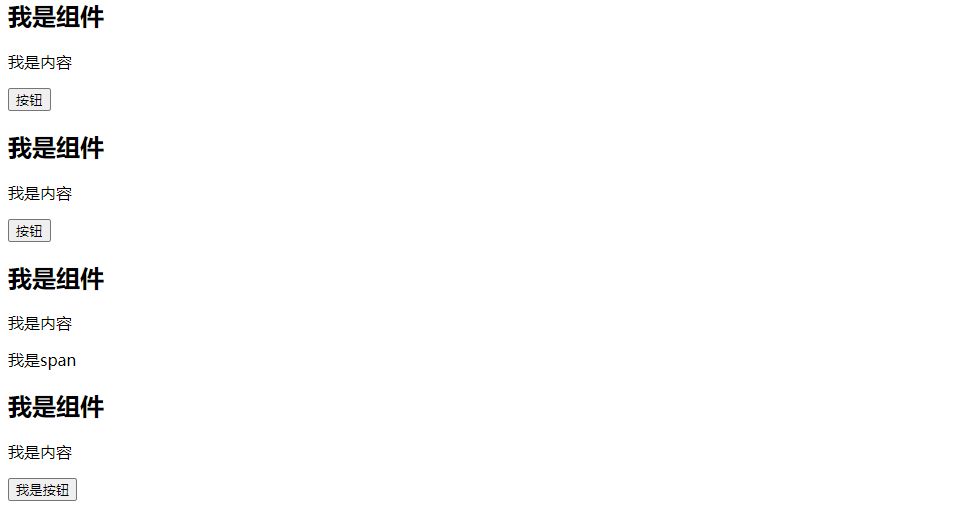
插槽是在子组件中可以占位的一个标签**== <slot> </slot> ==** 在父组件中使用子组件时可以在插槽处插入一些标签来使组件拥有可扩展性
且slot标签有默认值,在组件处的slot处所写的组件是默认值,在父组件中不添加标签就是使用默认标签,添加其他的标签之后就不会显示默认标签,显示扩展的标签,
一行插槽可以扩展多行标签
`<div id="app">`
  `<cpn>``</cpn>`
  `<cpn>``</cpn>`
  `<cpn>``<span>`我是span`</span>``</cpn>`
  `<cpn>``<button>`我是按钮`</button>``</cpn>`
`</div>`

`<template id="cpn">`
  `<div>`
    `<h2>`我是组件`</h2>`
    `<p>`我是内容`</p>`
    `<slot>``<button>`按钮`</button>``</slot>`
  `</div>`
`</template>`
`<script src="../js/vue.js">``</script>`
`<script>`
  const app = new Vue({
    el:'#app',
    data:{
      message:''
    },
    components:{
      cpn:{
        template:`#cpn`
      }
    }
  });
`</script>`
具名插槽slot
使插槽具有name属性,在父组件中使用插槽时,可以指定name来占用哪个插槽
有三个插槽,分别是三个按钮,父组件中只把name为left的插槽修改了,剩余两个插槽使用默认值。
`<div id="app">`
  `<cpn>``<span slot="left">`left`</span>``</cpn>`
`</div>`

`<template id="cpn">`
  `<div>`
    `<slot name="left">``<button>`按钮1`</button>``</slot>`
    `<slot name="center">``<button>`按钮2`</button>``</slot>`
    `<slot name="right">``<button>`按钮3`</button>``</slot>`
  `</div>`
`</template>`
`<script src="../js/vue.js">``</script>`
`<script>`
  const app = new Vue({
    el:'#app',
    data:{
      message:''
    },
    components:{
      cpn:{
        template:`#cpn`
      }
    }
  });
`</script>`

Webpack
webpack安装
在cmd中安装全局webpack3.6.0,因为vue2.0依赖该版本
` npm install webpack@3.6.0
webpack起步
src:源码 dist:打包
写完多个js文件后,无须在html页面中引入js文件,而是使用webpack来打包
在软件终端先cd到该目录下,后使用
` webpack ./src/main.js ./dist/bundle.js
将main.js和其中依赖的js都打包到bundle.js中
webpack配置文件(78集未听)
loader
算了 83-90都不听了
Vue CLI
安装Vue cli
` npm install -g @vue/cli
` vue --version 查看脚手架版本
` npm install -g @vue/cli-init 拉取脚手架2版本
Vue cli2
创建脚手架2项目
` vue init webpack 项目名
Vue cli3
创建cli3的项目` vue create 项目名称
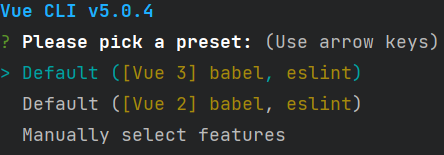
默认和手动
以下是点击手动后
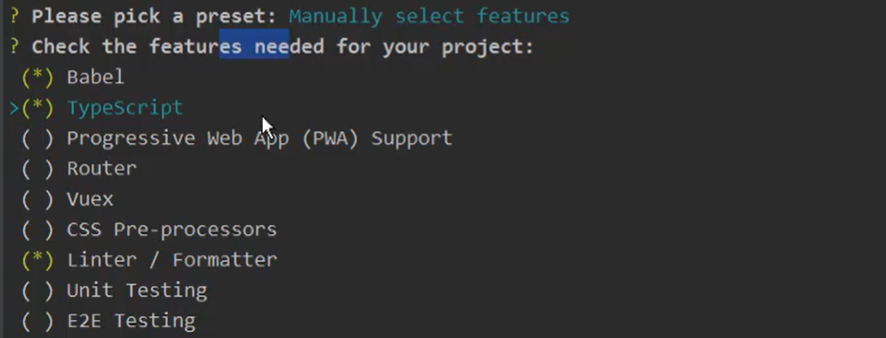
上下选择,空格选中,手动配置
选择之后回车,到以下步骤

1.放在单独的配置文件中 √
2.放在package.json文件中
点击第一个后,到下面步骤,询问是否保存

选y
后选择npm,开始安装
在终端输入,运行vue3项目
` npm run serve
修改vue cli配置
在命令行输入
` vue ui
打开仪表盘
Vue路由 VueCli2
前端渲染:
后端渲染:jsp或php将网页全部渲染,然后再显示在页面
安装vue-router
` npm install vue-router --save
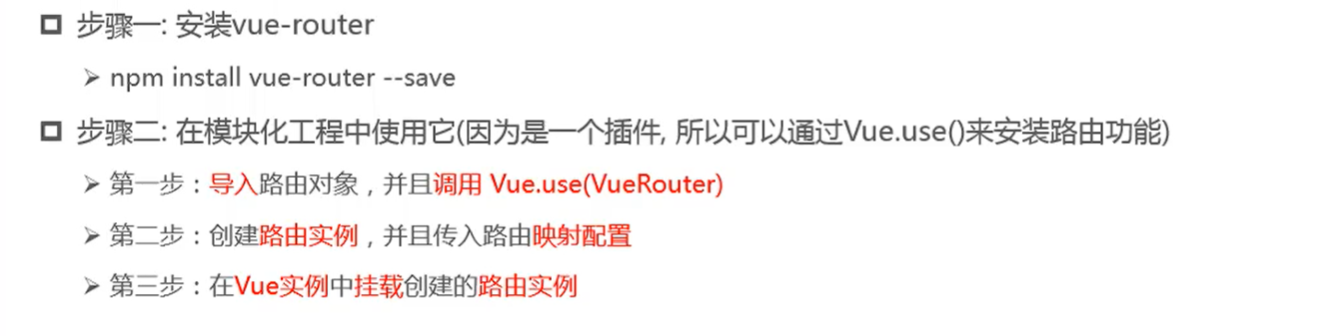
路由配置方式
在router文件夹下的index.js中
//配置路由相关的信息
import VueRouter from 'vue-router'
import Vue from 'vue'
//1.通过Vue.use(插件) 安装插件
Vue.use(VueRouter)
//2.创建VueRouter对象
const routes=[
]
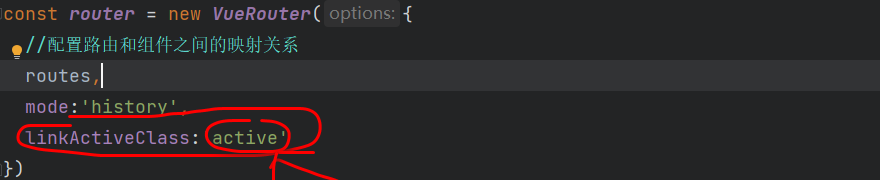
const router = new VueRouter({
//配置路由和组件之间的映射关系
routes,
mode:'history'
})
//将router对象传入到Vue实例中
export default router
导入两个插件使用vue安装插件创建VueRouter对象配置映射关系导出` 配置mode:'history' 渲染组件时,路径没有#号,而是普遍的url地址
在某个vue实例中
import Vue from 'vue'
import App from './App'
import router from './router'

Vue.config.productionTip = false

/* eslint-disable no-new */
new Vue({
  el: '#app',
  router,
  render: h =>` h(App)
})
先导入router` 再使用字面量增强:router:router
- 日后将在index.js中的第二步中添加很多url映射来表示跳转到哪个页面
- 并且每一个映射都是一个对象
使用vue-router的步骤
- 1.创建路由组件
- 2.配置路由映射:组件和路径映射关系
- 3.使用路由:通过
<router-link>和<router-view>
先创建两个组件,在components中
`<template>`
  `<div>`
    `<h2>`我是首页`</h2>`
    `<p>`我是首页内容,哈哈哈哈哈`</p>`
  `</div>`
`</template>`

`<script>`
export default {
  name: "Home"
}
`</script>`

`<style scoped>`

`</style>`
`<template>`
  `<div>`
    `<h2>`我是关于`</h2>`
    `<p>`我是关于内容,呵呵呵`</p>`
  `</div>`
`</template>`

`<script>`
export default {
  name: "About"
}
`</script>`

`<style scoped>`

`</style>`
通过右击->新建->`vue组件
在index.js中导入两个组件
import Home from '../components/Home'
import About from '../components/About'
在创建VueRouter对象的地方。每一个映射都是一个对象写法
//2.创建VueRouter对象
const routes=[
  {
    path:'/home',
    component:Home
  },
  {
    path:'/about',
    component:About
  }
]
对象中有两个键和值:` path:当url路径变为***时,触发component的值对象,对象就是从import所导入的
在App.vue,也就是启动的组件中的模板中写入
router-link
`<router-link to="/home" tag="button" replace>``</router-link>`
to可以改变url地址。tag可以将<a>标签改为<button>标签,replace可以不能后退到之前的页面。
由于点击按钮时会触发一些class,在路由index.js文件中修改一下,再设置一个css样式,可以实现,点击变色
index.js:
再在App.vue中设置一个css样式,可以对应到active

<router-link>首页</router-link>可以创建一个类似a标签的控件``可以改变url路径中的地址从而触发VueRouter对象中的键值<router-view></router-view>类似于占位符,当router-link的标签被点击时,组件渲染的地方
`<template>`
  `<div id="app">`
    `<router-link to="/home">`首页`</router-link>`
    `<router-link to="/about">`关于`</router-link>`
    `<router-view>``</router-view>`
  `</div>`
`</template>`

`<script>`
export default {
  name: 'App'
}
`</script>`

`<style>`

`</style>`
路由的默认路径{ path:'/', redirect:'/home'}` 使用重定向,在第一次点击网页时就可以显示首页
button方式
不使用router-link跳转,而使用按钮和绑定单击事件来跳转
方法在export default中使用
` 在单击触发的方法中,使用this对象的$router方法。同样,拥有push()和replace两种方法,前者可返回,后者不可返回,参数是路由中的映射
`<template>`
  `<div id="app">`
    `<button @click="btnhome">`首页`</button>`
    `<button @click="btnabout">`关于`</button>`
    `<router-view>``</router-view>`
  `</div>`
`</template>`

`<script>`
export default {
  name: 'App',
  methods:{
    btnhome(){
      this.$router.replace('/home')
    },
    btnabout(){
      this.$router.replace('/about')
    }
  }
}
`</script>`

`<style>`
  .active{
    color: red;
  }
`</style>`
动态路由,并且传参
使用params的类型
在路由代码的index.js文件中,在routes的多个映射中的path的值中添加参数
{
    path:'/user/:userid',
    component: User
  }
后面的:userid即是参数
在传递参数的一端使用<router-link>时,将修饰符to ,改为==:to== ,意为被vue所解析,并且在,组件的data中定义属性
`<router-link :to="'/user/'+userid" tag="button">`关于`</router-link>`
` userid即是要传输过去的参数
data(){
    return{
      userid:'zhangsan'
    }
}
` 在组件data中定义userid
最后在最终跳转过去的页面的组件中使用计算属性来获取传输过去的参数
export default {
  name: "User",
  computed:{
    userid(){
      return this.$route.params.userid
    }
  }
}
使用 this.$route.params.userid 来获取userid并用插值=={{}}==语法显示在页面中也可以在插值语法中直接=={{$route.params.userid}}==,就是省略计算属性这一步其中,router :是路由对象routes :是多个路由映射` route :是当前活动的路由
使用query的类型
之前是在路由映射时,在path的值中写:id,来接收传输过来的参数,传输端也必须写完整的路径,现在可以使用query类型来传输参数,有以下特点
1.路由映射无须在路径带参数,直接写普通路径即可
2.在传输端的:to的地方不在写单一的路径,而是
` {path:'/路径',query:
在一个对象中,有path 和query 两个键,path键表示要映射哪个组件。query表示传输过去的参数,传输的参数是一个对象类型。如
<router-link :to="{path:'/profile',query:{name:'erickiku',age:18,height:1.88}} "tag="button">Profile</router-link>
就是传输到一个profile所映射的组件中,并且传输过去name,age,height三个参数,网页显示的路径是以==?== 拼接的。
在接收端接收参数是:
`<p>`{{$route.query.name}}`</p>`
`<p>`{{$route.query.age}}`</p>`
`<p>`{{$route.query.height}}`</p>`
路由懒加载
两种方式:都需要把最上方的import的引入组件的代码删除
① 在路由映射的component处将 ==component:Home== 改为 ==component:() =>import('../components/Home')==② 在之前import导入组件的地方改为 const Home =() =>import('../components/Home') 再将==component:Home== ,即可`
//2.创建VueRouter对象
const routes=[
  {
    path: '/',
    redirect:'/home'
  },
  {
    path:'/home/:homeid',
    component:() =>` import('../components/Home')
  },
  {
    path:'/about/:aboutid',
    component:() =>` import('../components/About')
  },
  {
    path:'/user/:userid',
    component: () =>` import('../components/User')
  }
]
或者
const Home =() =>` import('../components/Home')
const About =() =>` import('../components/About')
const User =() =>` import('../components/User')
路由的嵌套使用
也就是子路由
如在/home目录下还有一个/home/news文件
想要访问news或其他子目录,需要路由嵌套
{
    path:'/home/:homeid',
    component:() =>` import('../components/Home'),
    children:[
      {
        path: '',
        redirect:'news'
      },
      {
        path:'news',
        component:() =>` import('../components/HomeNews')
      },
      {
        path:'message',
        component:() =>` import('../components/HomeMessage')
      }
    ]
}
在/home的路由映射中,写入第三个属性children,参数同样是==[]==数组,和父目录一模一样,
创建方式也一样。
只有在子目录中想要使用**router-view**占位符时,不再是在App.vue中,而是在其父组件中写==``<router-view>和跳转标签<router-link>
全局导航守卫
用于监听全局的路由事件
例如,要改变所点击的组件的title值.
使用 router.beforeEach() 前置钩子(hook)/前置守卫(guarg)
在路由映射中添加一个属性,和path同级
next()可以有参数:**next(false)**中断当前导航、**next('/')**跳转到指定地址、
meta:{
  title:'用户'
}
案例:
router.beforeEach((to,from,next) =>` {
  document.title=to.meta.title
  next()
})
使用 router.afterEach()
还有路由独享守卫` 组件内的守卫
keep-alive
保持组件活跃,不会频繁销毁、创建
`<keep-alive exclude="User">`
	`<router-view/>`
`</keep-alive>`
将router-view包裹后,所有在router-view显示的组件都将保持生命,include是包括哪些` exclude是不包括哪些,案例是不包括name为User的组件
Promise
一般情况下是有异步操作时,使用Promise对这个异步操作进行封装
new Promise(),定义一个异步对象
参数是一个函数:(resolve,reject)
resolve和reject本身就是函数
setTimeout处写准备处理的数据,then()处理具体的事务
new Promise((resolve,reject) =>` {
    setTimeout(() =>` {
    	.
        .
	},1000)
})
//setTimeout()代表一个异步线程
如果有很多异步,可以在一个线程中再return new Promise()
resolve会跳转到then。
reject会跳转到catch
new Promise((resolve,reject) =>` {
    setTimeout(() =>` {
      resolve(),
      reject()
    },1000)
  }).then(() =>`{
    console.log('hello');
    console.log('hello');

    return new Promise((resolve,reject) =>` {
      setTimeout(() =>` {
        resolve()
      },1000)
    })
  }).then(()=>`{
    console.log('hello');
    console.log('hello');
  }).catch(()=>`{
    console.log('err');
  })
catch函数可以在then里面.then((data)=>{},(err)=>{})` 满足就执行第一个,不满足就执行第二个
Vuex
一种专门为Vue.js应用程序开发的状态管理模式
需要安装在项目中
` npm install vuex --save
安装失败解决方法:
` npm install vuex@3.6.2 -S
安装成功之后在src下创建store 文件夹
创建index.js
之后在main.js中引入
import Vue from 'Vue'
import Vuex from 'Vuex'

//安装插件
Vue.use(Vuex)

//创建对象
const store = new Vuex.Store({
state:{
    counter:1000
  },
  mutations:{

  },
  actions:{

  },
  getters:{

  },
  modules:{

  }
})

//3.导出store
export default store
import Vue from 'vue'
import App from './App'
import router from './router'
import store from "./store";//--------------
Vue.config.productionTip = false

/* eslint-disable no-new */
new Vue({
  el: '#app',
  router,
  store,//----------------
  render: h =>` h(App)
})
` 如果在store对象中的state方法中定义了属性,则这个属性可以被全局的组件所使用,使用方法是:如定义了一个counter
`<h2>`{{$store.state.counter}}`</h2>`
` 最好 不要直接修改store中state中的值,应该通过mutations来修改
通过mutations来操作state中的值
这里定义了两个方法,分别是state和mutations` mutations中有两个函数,用来操作state中的值
const store = new Vuex.Store({
  state:{
    counter:1000
  },
  mutations:{
    increment(state){
      state.counter++
    },
    decrement(state){
      state.counter--
    }
  },
  actions:{

  },
  getters:{

  },
  modules:{

  }
})
调用mutations中的函数不是直接调用函数名,而是用this.$store.commit('increment') 来提交` 参数是函数名
`<template>`
  `<div id="app">`
    `<h2>`{{$store.state.counter}}`</h2>`
    `<button @click="add">`+`</button>`
    `<button @click="sub">`-`</button>`
    `<HelloVuex>``</HelloVuex>`
  `</div>`
`</template>`

`<script>`
import HelloVuex from "./components/HelloVuex";
  export default {
    name: 'App',
    components:{
      HelloVuex
    },
    methods:{
      add(){
        this.$store.commit('increment')
      },
      sub(){
        this.$store.commit('decrement')
      }
    }
  }
`</script>`
Vuex核心概念
1、 State 2、Getters 3、Mutation 4、Action 5、Module
State单一状态树
尽量不要定义多个store
state中存放数据,用于被其他类如getters调用
state中的属性,可以被全局调用
`<h2>`{{$store.state.counter}}`</h2>`
但是尽量不要直接修改state中的值,应该用其他方法来调用state中的这个值,类如上一条目录中用mutations来操作state中的数据
Getters
在getters中可以写函数,用于操作state中的属性。
getters中的函数有都有两个参数,第一个是 state本身,第二个是getters本身,不接受其他参数
getters:{
    powerCounter(state){
      return state.counter * state.counter
    },
    more20stu(state){
      return state.students.filter(s =>` s.age >`20)
    },
    more20stuLength(state,getters){
      return getters.more20stu.length
    },
    moreAgeStu(state){
      return function(age){
        return state.students.filter(s =>`s.age >` age)
      }
    }
  }
其中有四个函数powerCounter(stae) 是获取state中的counter的平方more20stu(state) 是获取大于20岁的学生more20stuLength(state,getters) 是获取长度,而且传入了getters,调用另一个函数more20stu来使用他的函数体` moreAgeStu是根据传输的参数来获取大于这个参数的学生,但是只能传输两个参数,所以要return一个function,用function来接收传输过来的数据
调用时:
{{$store.getters.powerCounter}}带参:`
{{$store.getters.moreAgeStu(20)}}
Mutations状态更新
在通过mutation更新数据的时候,可以携带一些额外参数。这个参数成为负载/载荷(Payload)
mutations:{
    increment(state){
      state.counter++
    },
    decrement(state){
      state.counter--
    },
    incrementCount(state,value){
      state.counter += value
    }
  }
其中有三个方法,分别是+和-还有一个携带了参数,携带参数时,提交是这样的:```vueaddCount(value){this.$store.commit('incrementCount',value)}```在提交的名称后加一个参数` 如果参数较多,就可以直接封装为一个对象,传输一个对象
另一种提交风格
提交的commit是一个对象,有type和另一个携带参数
type对应的就是mutations中的函数
addCount(value){
        this.$store.commit({
          type:'incrementCount',
          value:value
        })
}
接收的时候,第二个参数就成为payload,是一个对象,包含了commite中对象的所有键
incrementCount(state,payload){
      state.counter += payload.value
}
Action
不能在Mutation中进行异步操作
Action类似于Mutation,但是用来代替Mutation进行异步操作的
在actions中定义了一个aUpdateInfo函数,第一个参数固定,上下文。第二个是传参
返回一个Promise对象
actions:{
    aUpdateInfo(context,message){
      return new Promise((resolve, reject)=>`{
        setTimeout(()=>`{
          context.commit('increment');
          console.log(message);

          resolve('success')
        },1000)
      })
    }
}
然后在调用的地方写then
this.$store.dispatch('aUpdateInfo','我是message')返回的就是一个Promise对象,所以可以直接.then,并且可以带回来一个参数
updateInfo(){
        this.$store.dispatch('aUpdateInfo','我是message')
          .then((res)=>`{
            console.log('提交成功');
            console.log(res);
          })
}
Modules
在modules中可以再定义其他所有的属性:state,getters,mutations,action这些
并且,在调用时:
如,定义了一个模块a,并且state中有一个name属性,则是这么调用的
const moduleA={
    state:{
        name:'zhangsan'
    },
    mutations:{},
    getters:{},
    action:{}
}


modules:{
    a:moduleA
}
调用name:
$store.state.a.name
提交Mutation的方法和之前是一样的
调用Getters的方法也和之前一样,直接调用,不用管是否在模块里
模块中的getters中的方法有三个参数,前两个是state和getters,第三个是rootState,也就是默认state中的数据,可以用rootState.counter来获取之前案例的counter的值
Vuex的目录组织结构
1.将state属性抽离在index.js的store对象外
2.将getters、mutations、action三个属性抽离到一个单独的文件中,在导出和引入
3.将modules抽离成文件夹,在modules的模块创建在文件夹下的单独文件中。
4.最后都在index.js中引入
安装devtools
https://blog.csdn.net/qq_51558433/article/details/118107157